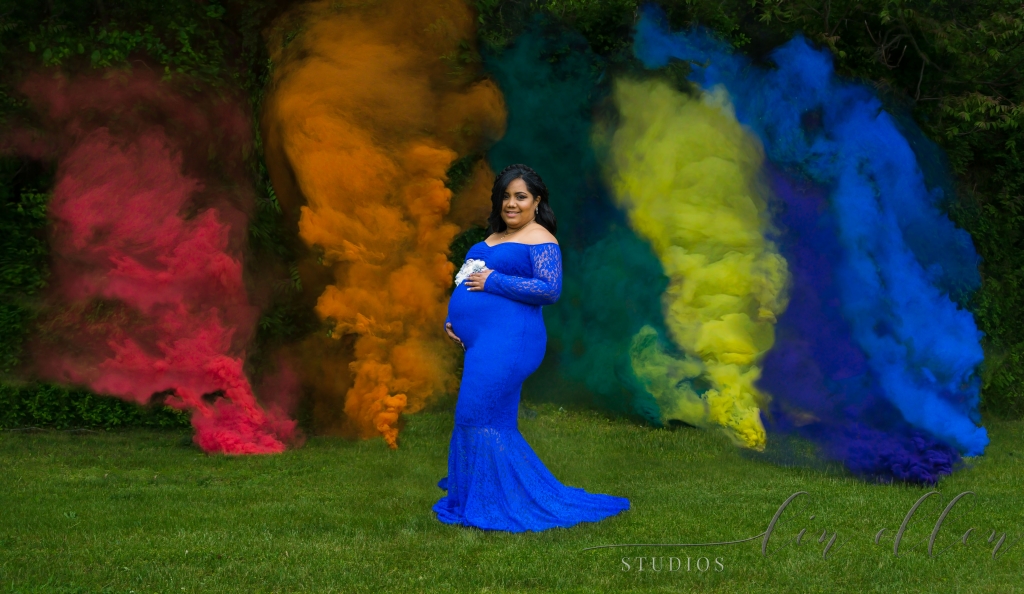
I was recently asked to create a rainbow smoke bomb portrait for a maternity session at my New Jersey studio. I really wanted to create a beautiful and memorable portrait for this expecting mama after the loss she suffered.

Sooooo, Google is my friend, right?? Well, not so much. I found limited information. But, determined to make this shoot special, I forged ahead. I love a challenge! I got lucky and did a few things right, and….a few things went wrong. And things going wrong, when you are measuring your shots by the second, usually don’t go well. All in all, I was happy and my client was thrilled. That said, there are things that I will definitely require in the future to avoid some of the pitfalls I encountered.
I’ve created this post to share some tips about creating your Smoke Bomb Photos, especially a Rainbow Maternity Photo. This photo took HOURS to create something I was happy with. The highest the smoke got was approximately two feet. Yicks!!
Smoke Bombs
I purchased a set of six primary colored wire pull smoke bombs from Shipped Yesterday – the Enola Gaye EG25. This was probably my biggest mistake. I gave a choice between the Micro and Regular smoke bombs. The micro bombs last appx 30-45 seconds. One of mine lasted only 20 seconds! The regular up to 90 seconds. About half the cost. if I ever do this again, I will require the Regular Smoke Bombs for 90 seconds of color. The cost is about $75 plus shipping.
Location
I did this shoot at my South Jersey Photography Studio. It is on private property. In New Jersey, smoke bombs are legal. I found this out because I called the Fire Marshall for my town in advance. I might also consider alerting your neighbors especially if you are using white or black smoke. Using primary colors, and set away from the nearest house, we were fine. On the positive, my studio has a nice screen of trees that cut down on the breeze. But unfortunately, when a maternity photo shoot is scheduled, you can’t really predict the wind. Even with the trees, my day had a light breeze. Breeze is not your smoke bomb friend! If I do this again, I would take out big V-Flats to block the breeze. It might help.
Shooting
Do at the end of the shoot, when your model has been posed for awhile – you will not have time to give posing directions! We all rehearsed our roles. Mom-to-be posed for a few shots without the smoke bombs. Thank goodness, because I ended up using one of her pre-bombs shots.
If I do this again, I will have an upright holder for the smoke bomb, labeled with the colors. I laid out my bombs in color order, spaced out appropriately. In the “heat of the moment” one of the family members that was charged with pulling the wire, simply tossed the smoke bomb. Of course, it landed right in front of the other colors. Another tossed the bomb too far away from the others – whoops! So the very short time I had to shoot was telling someone to move the purple at the same time I was shooting! Just a bit chaotic.
As a safety precaution, I used a darker colored dress as I have read that the smoke can dye your gown. I think I was too far away from the smoke, but I didn’t want to take any chances. I also had fire retardant gloves and a smoke detector. Both might have been overkill, but I didn’t want any issues.
I did all the smoke bombs at the same time. There were three helpers and six bombs. I might also consider doing the bombs one at a time. I like how the colors blended together naturally and was unsure if I could make it look realistic in post-production.
At the end of the day, I was happy with my Rainbow Maternity Smoke Bomb shoot. I would definitely make some different choices if I did this again, but was able to save the images in but a lot of Photoshop work afterwards.


